Drain and blow out your irrigation system before the first hard frost
The first hard frost usually arrives without much warning. Most irrigation components are vulnerable once air temperatures drop and stay below 0°C overnight, and at the shallow burial depths typical of UK amenity systems, a sustained cold spell can freeze water in pipes, valve bodies, and heads just as reliably as it freezes a puddle. By mid-November, that kind of weather is well within reach across most of the country. If your irrigation system is still full of water, the time to drain it is now.
What freezing does to a full pipe
Water expands by about nine per cent when it freezes. Inside a sealed pipe or a capped sprinkler head, that expansion has nowhere to go. The pipe wall splits, the head body cracks at the neck, or a valve housing fails. You usually won’t know until you start the system in spring and find a flooded zone or a head that sits permanently open. A drain-down in November costs an hour of your time. The repair job in April costs considerably more.
The risk is higher where backflow preventers are left exposed above ground over winter, or where sections of pipe hold standing water at low points between valve boxes. These are the spots that fail first.
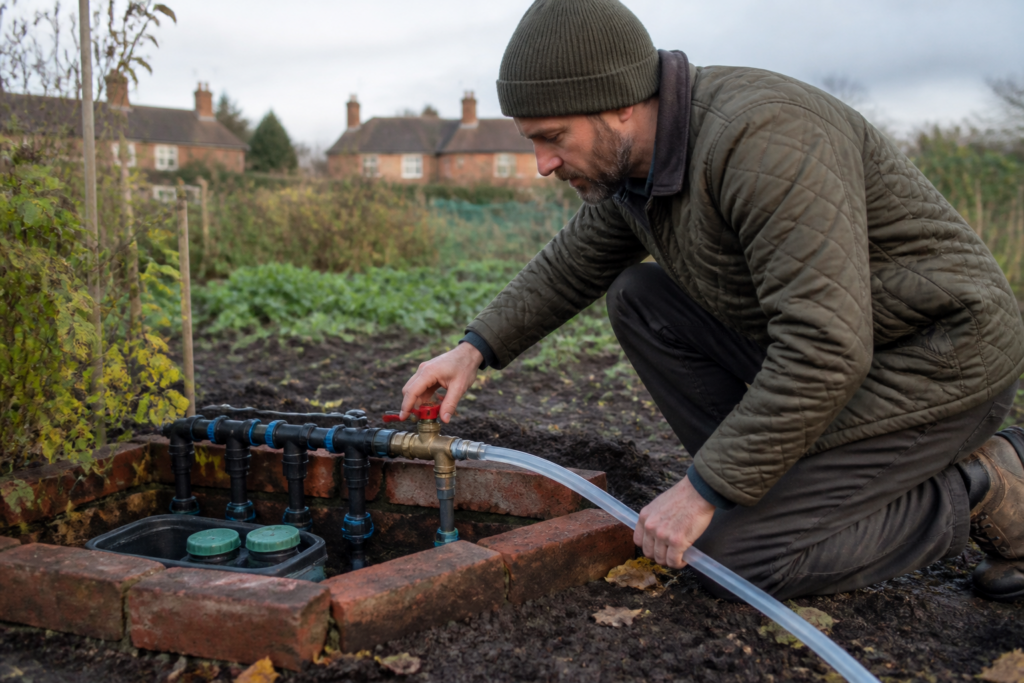
Manual drain valves or compressed-air blowout?
The right method depends on how your system was installed. Manual or automatic drain valves release water at low points and zone ends without any extra equipment. Systems built this way have the valves already fitted; you open them, let gravity do the work, and close them again in spring. The limitation is that low points and valve stations have to be correctly positioned, which older or retrofitted installations often aren’t.
The compressed-air blowout pushes air through each zone to force residual water out through the heads. It is more reliable for systems without drain valves, and for any site with significant changes in elevation where gravity won’t clear the pipework fully. You’ll need a compressor with a flow rate of at least 20 CFM (cubic feet per minute) for a small residential system, rising to 50 CFM or more for larger-diameter pipe. Most domestic compressors won’t manage it at scale; on larger sites a hired unit is usually the answer.
How to carry out the blowout
A few things before you start: shut off the main supply to the irrigation system first. Never stand directly over a head while blowing a zone. Keep people and animals clear. Do not run any zone for more than two to three minutes per pass; extended blowout at pressure can overheat plastic head components.
- Connect the compressor to the blowout port, usually a quick-connect fitting on the backflow preventer or manifold.
- Open the zone furthest from the compressor on your controller.
- Increase pressure gradually until water and then mist exits the heads. Typical working pressure for pop-up rotors is 40 to 50 PSI; drip zones need significantly lower pressure to avoid damaging emitters.
- Once only air exits, switch to the next zone and work back towards the compressor.
- Repeat the cycle two or three times per zone to clear residual water from low spots in the pipe run.
After the blowout, open any manual drain valves at valve boxes and leave them cracked open until spring.
Insulate what you can’t drain
Some components can’t be cleared by air alone. Backflow preventers, above-ground valve assemblies, and any exposed pipework close to buildings should be wrapped with pipe lagging or closed-cell foam insulation and secured with waterproof tape so it doesn’t lift in wind. Even a brief frost on an uninsulated backflow preventer can crack the body; replacement units are not a small cost.
If your system has a rain sensor, remove it now and store it indoors. Low temperatures can damage the hygroscopic disc inside, and that’s an easy thing to protect at no cost.
Before you close the system for winter
Note any zones that didn’t behave normally during the blowout: heads that failed to pop, zones that took longer to clear, or valve boxes with pooled water. Set your controller to its off or rain mode rather than unplugging it; this keeps the programming intact. Checking the system before you need it again in April means you’re not chasing a technician at peak season. A photograph of the valve box layout takes minutes and can save real time when repairs or extensions come up next year.
Frequently asked questions
When should I winterise my irrigation system in the UK?
Aim to drain or blow out the system before the first forecast frost in your region. In northern England and Scotland that can mean October; across most of England and Wales, mid-November is a reasonable deadline. Do not wait until the ground is already frozen.
Can I drain my irrigation system without a compressor?
If your system was installed with manual or automatic drain valves at low points and zone ends, yes. Open each valve and allow gravity to clear the water. Systems without drain valves need a compressed-air blowout to remove residual water from low spots in the pipe run.
What size compressor do I need for an irrigation blowout?
It depends on pipe diameter. Small residential systems may manage with 20 CFM; larger amenity or commercial systems typically need 50 CFM or more. An undersized compressor won't clear the pipes reliably in a single pass, so hired plant is often the practical option for bigger installations.
Is it safe to blow out an irrigation system yourself?
The process is straightforward if you follow the basic precautions: shut off the water supply first, never stand over a head during the blow, keep people and animals away from the zone, and do not run any zone for more than two to three minutes per pass. If you are unsure, a qualified irrigation contractor can carry it out quickly.
Do I need to do anything to the controller after winterising?
Set the controller to its off or rain-delay mode rather than unplugging it. This keeps your zone programming intact for spring. Some controllers have a dedicated seasonal shutdown mode. Remove any rain sensors and store them indoors to protect the sensor disc from frost damage.