Calibrate your sprayer and check nozzle wear before the season starts
Most sprayers sit idle through January and February, and that is the right time to go through the machine properly. Leaving it until the morning of the first application means rushing something that should not be rushed. A worn nozzle does not look different from a new one, but it can put you outside the label rate before the first tank is empty.
Check nozzle wear before anything else
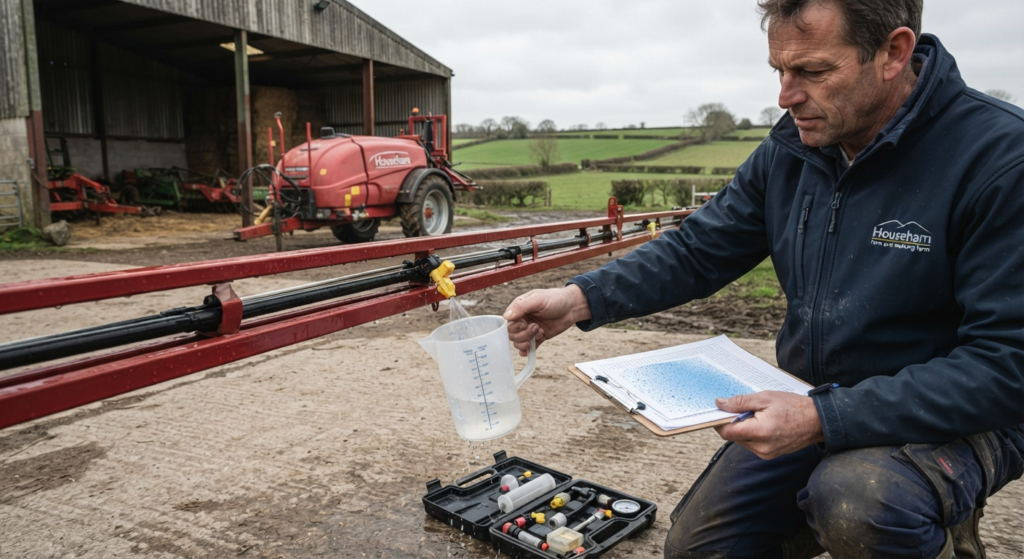
Fill the tank with clean water, set your normal working pressure, and catch the output from each nozzle into a measuring jug for 30 seconds. Compare the volume to the manufacturer’s rated output. Any nozzle delivering more than 10% above the rated figure should be replaced; the spray pattern will usually have deteriorated by that point too, even if the overall volume looks roughly acceptable.
Hold a piece of water-sensitive paper below the boom while each nozzle runs. You are looking for an even spread with no gaps, heavy streaks or dry patches. An uneven pattern causes coverage problems that no calibration adjustment will fully correct once you are on site.
Nozzle body filters are easy to forget. Remove them and check for cracks, distortion or partial blockages. A partially blocked filter distorts both pressure and output without being at all obvious from the outside.
Calibrate output and travel speed together
Output from the nozzles is only part of the calibration. You also need to confirm your actual travel speed at the gear and throttle setting you plan to use on site. Mark out 100 metres on a flat, level surface, drive it at your intended speed, and time the run. Use that speed, alongside your nozzle output and spacing, to calculate your application rate in litres per hectare.
If the calculated rate does not match what the label requires, adjust pressure or travel speed and recheck. Plenty of sprayers go out to work with calibrations from the previous season, without anyone checking whether a slow build-up of nozzle wear or a small change in working practice has shifted the actual rate.
It is worth checking pressure gauge accuracy too. Mechanical gauges drift, particularly after a season of vibration or exposure to freezing conditions. A glycerine-filled gauge holds calibration better than a plain one, but all gauges should be treated with some scepticism if the reading is critical to your label rate.
Clean out residues from the previous season
If any product was left in the tank over winter, clear it out before calibration work begins. Some herbicide chemistries, sulfonylureas in particular, remain active at very low concentrations and can damage the next sward or crop you apply to, even heavily diluted.
The clean-down procedure is a triple rinse: fill the tank to at least 10% capacity with clean water, agitate and run through the boom and nozzles, then empty completely. Repeat twice. Dispose of the rinsate on a suitable area of land according to the product label. Pouring rinsate into a drain or watercourse is illegal under UK water pollution legislation.
Wear appropriate PPE for clean-down work. Check the safety data sheet for each product that was in the tank; the requirements vary by chemistry, but gloves, eye protection and waterproofs are commonly specified. Do not rely on memory for this.
A few more checks before the first run
With calibration and residue clean-down done, run through the rest of the machine. Check hydraulic hoses for weeping joints or surface cracking. Test the agitator. Make sure boom sections fold and lock correctly. These checks take ten minutes and cost nothing to fix now; on site, they can cost a full day.
Keep a written record of your nozzle test results, travel speed and calibration date. Several contractor certification schemes and commercial contracts require documented evidence that the sprayer was set up correctly before use. Having that paperwork ready is a minor thing, but it becomes urgent remarkably quickly when a contract manager asks for it.
Frequently asked questions
How often should I calibrate my sprayer?
At the start of each season, and again after changing nozzles, working pressure or travel speed. Many contractor certification schemes also require a dated calibration record before work begins.
What is the quickest way to check nozzle wear?
Catch the output from each nozzle into a measuring jug for 30 seconds at your working pressure using clean water. If any nozzle delivers more than 10% above the manufacturer's rated volume, replace it.
How should I dispose of tank rinsate?
Apply it to a suitable area of land as the product label specifies. Never pour it down a drain or into a watercourse. Triple rinsing the tank is the standard procedure before any maintenance or cleaning work.
Does nozzle material affect how quickly nozzles wear?
Yes. Ceramic and stainless steel nozzles last considerably longer than plastic ones. Abrasive formulations and high-pressure working accelerate wear on any nozzle type, so check the output more frequently if you use these regularly.
Can I rely on a sprayer calibration from last season?
Only if nothing has changed and nozzles have been checked since. Output and travel speed both drift over a season. A fresh check at the start of the year takes around 20 minutes and removes the uncertainty.